


Many manufacturers install an RV skylight when creating their campers. However, as lovely as they may be, the sun and other weather can cause damage to them over time.
Luckily, finding and installing a new one is much easier than most people think. Even if you have minimal DIY skills, you’ll likely be able to tackle this project.
Today, we’ll help you locate and install your RV skylight replacement and check it off your to-do list. Ready to get started?
Let’s go!
Like a residential home, an RV skylight is a clear opening in the roof. They’re made from hard plastic materials and increase the natural lighting inside a space. While they’re made from durable materials, they’re not invincible. Mother Nature and many weather elements can quickly increase their wear and tear, and they may need replacing sooner than expected.
Pro Tip: If you want to beat the build-up of condensation in your RV, be sure to read …Keeping Moisture Out of Your RV for more!
RV skylights typically have skylights in the bathrooms to increase the natural lighting and make the space feel larger. Manufacturers typically place them directly above the shower to minimize the feelings of claustrophobia.
Additionally, skylights are a great way to connect with nature and the outdoors. You’ll be able to look out them and see the trees, clouds, and, occasionally, a curious squirrel or bird.
Many RV owners appreciate skylights as they create a more luxurious and home-like atmosphere inside their camper. Over the last several years, many consumers have sought features that provide a more residential look and feel.
Unfortunately, constant exposure to the sun and weather elements can cause the materials to weaken. This can result in cracks and other breakages developing in your RV skylight. Additionally, you may accidentally drive under a low branch, or the wind can knock one loose. Either way, we’ve compiled a list of places to look if you need an RV skylight replacement.
Many RV dealerships have some sort of parts and supply store inside their facilities. They’ll often sell essentials that customers frequently need. Even if they don’t have the exact replacement RV skylight for your rig, they’ll likely know where to order it. But be ready to pay a premium, as these are typically some of the most expensive options.
If you’re lucky, you’ll be able to find an RV parts store nearby. Your best bet to locate these facilities is to search Google or ask around the campground, especially the management. Many of these individuals have connections in the local community. They’re often aware of the best places to get specific items. These can be more expensive, but you may not have any other choice.

One of the cheapest options for an RV skylight replacement will be through online retailers. You can find various options available through Amazon and other major platforms. Despite this, you’ll want to double-check your measurements and ensure you get the proper size. If not, you could spend more money or deal with the hassle of returning items.

- RV Skylight Replacement: RV Skylight dome opening dimension: 14″ x 22″ x 4″, outer RV skylight cover dimension: 18″ x…
- Strong Durable Construction: The RV skylight is constructed from super durable and thicker polycarbonate material which…
If you’re struggling to find a replacement RV skylight for your rig, it may be easiest to go through your manufacturer. Sadly, some brands won’t work directly with owners and require you to go through an authorized dealer or repair facility. Regardless, it doesn’t hurt to ask.
Give them a call or shoot them an email and see what they say. We’ve heard of some having tremendous luck with this method. They’ve even had parts arrive directly from the manufacturer at their door a few days later. It’s their way of taking care of customers even after the sale.
Many local RV repair shops work directly with manufacturers to do repairs. Be aware that since they’re getting the parts for you, they may also upcharge you for the same part. Remember, they’re a business, and they’ve got bills to pay. On the other hand, they may cut you a deal if you have them install the part instead of doing it yourself.
Once you have purchased and acquired the replacement RV skylight, it’s time to start installing it. Let’s walk through the necessary steps and some tips to help ensure you end up with the best possible results.
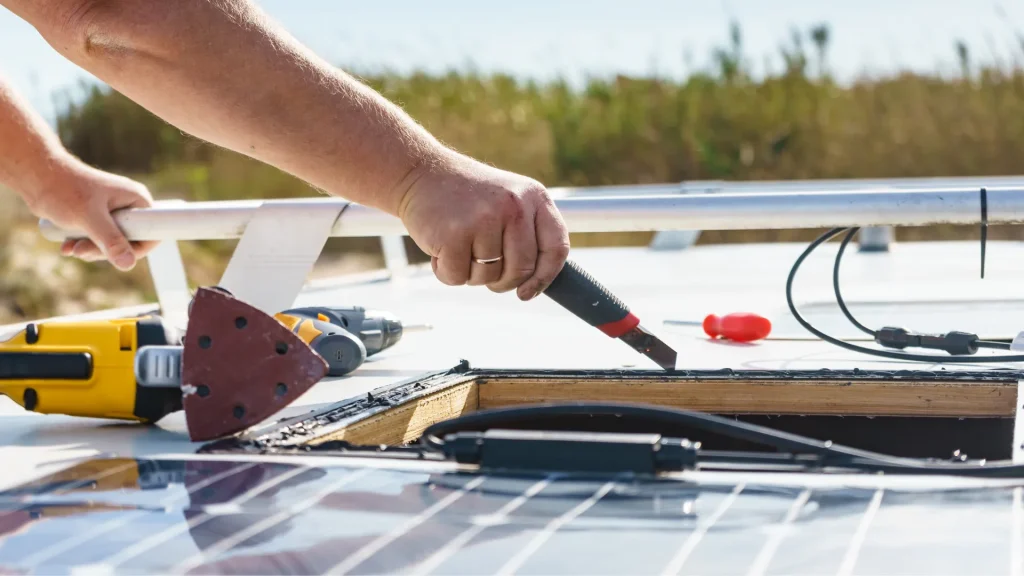
The first step in this process is to remove the old skylight. The first step will be to remove the old sealant surrounding the skylight. It’s best to use a putty knife, which can remove the sealant but is less likely to damage the roofing membrane.
You’ll likely need a screwdriver or drill to remove any screws you find holding the skylight in place. Generally, it’s safe to toss these into the trash, as the new skylight will come with new screws to do the job. Peel away the skylight as soon as you’ve removed all the screws and sealant.

- Quick release buckles to secure when rolled
- Metal grommets for hanging vertically
With the old skylight removed, you can now start cleaning the area. Again, use the putty knife to clean any remaining sealant. If you need extra help, grab mineral spirits and a clean rag. Liberally apply the mineral spirits to the surface and gently scrub them away. You can then switch back to the putty knife, and you should be able to remove the remaining sealant.
You must get the area as clean as possible. This helps ensure you get the best possible connection between the skylight and your camper. It also drastically reduces the chances that water or moisture will get into your camper and cause damage.

To prepare the replacement skylight, you should first put it in place and ensure it is a proper fit. You want to avoid getting too far into the project and realize your skylight isn’t the correct size. Once you’ve confirmed that everything lines up correctly, you can continue to prepare it for installation.
To do this, you’ll want to apply butyl tape around the base of the skylight, including the screw holes. This tape is an additional layer of defense against water and moisture. Give the tape a few minutes to ensure it secures to the skylight before installing it.
Now, it’s time to place the new skylight into its new spot on your roof. It should cover the existing holes from the previous skylight when properly placed. If not, you’ll want to fill these holes with sealant before installing the new skylight.
With the skylight in place, you’ll want to install the new screws to keep the skylight further secured to your roof. Luckily, butyl tape doesn’t require much time to adhere to the roofing membrane.
With your RV skylight replacement in place and secured to your roof, it’s time to apply sealant. Make sure you confirm that the sealant you purchase is compatible with the type of roof you have. Check with your manufacturer or research to see if you have an EPDM or TPO roof.
Use a caulking gun to apply sealant liberally but evenly around the edges of the skylight. A self-leveling sealant will spread itself out and do the hard work for you, but don’t get carried away with it. Use only enough to get the job done, and give it plenty of time to dry. These sealants usually require 24 to 48 hours to dry thoroughly.
Once you’ve given the sealant time to dry, you’ll want to inspect and test the skylight for leaks. We’ve mentioned it several times, but it bears repeating: water and moisture are your biggest enemies. You must do whatever you can to prevent it from getting in.
Testing for leaks will require using a hose or buckets of water on the skylight. Have someone inside look for any evidence of water intruding into your rig. If you notice this, you must let things dry and apply more sealant.
Additionally, you’ll want to continue to inspect the sealant regularly. Most owners check it every 60 to 90 days. It’s best to catch these issues early before they become significant problems.

As you can see, replacing your RV skylight isn’t nearly as challenging as you might think. You can get the job done as long as you can access your roof and have a few basic tools and supplies. Nevertheless, as with any roof project, you must be extremely careful. A trip to the nearest emergency room wasn’t one of the steps we included. So, watch your step and be careful.
