


One of the most common complaints we hear from side-by-side owners concerns sagging stock suspension. The fact of the matter is, it’s a rare occasion when stock UTV suspension works perfectly from the factory. It’s not really the fault of the side-by-side manufacturer; they have a median payload setting that they use for setting stock ride height, which could be two 170-pound riders, no matter if the car has two seats or four. It’s really up to the new side-by-side owner to set their suspension up for the payload they carry and the type of shock performance needed for the terrain they desire most.
“The biggest question we get is, ‘After I load down my UTV, why does it sit so low?’ There are a couple of reasons for that,” claims Shock Therapy’s Jon Crowley. “One is you’re adding weight to the vehicle, and that’s going to settle the springs down. The other is that stock springs, over time, will lose effectiveness and start to sag. You can add ride height to adjust that,” says Crowley.
We used a Can-Am X3 Max four-seater with 31-inch tires as our test machine for suspension adjustment, as this machine tends to sit lower than most when loaded to the hilt. “It’s really important for you to be at the correct ride height on an internal bypass shock like those on the Can-Am X3,” says Crowley. “The bypass tube is set up in different stages, and if your car is riding too low, you could be at a point in the valving where it thinks you’re bottoming out and it wants to stiffen up the ride, so you’re bumping up against that hard valving all the time.” This is why so many side-by-side owners believe their stock side-by-side suspension is sprung too hard but make it worse by softening preload. To make it better, you must increase ride height by cranking down preload.

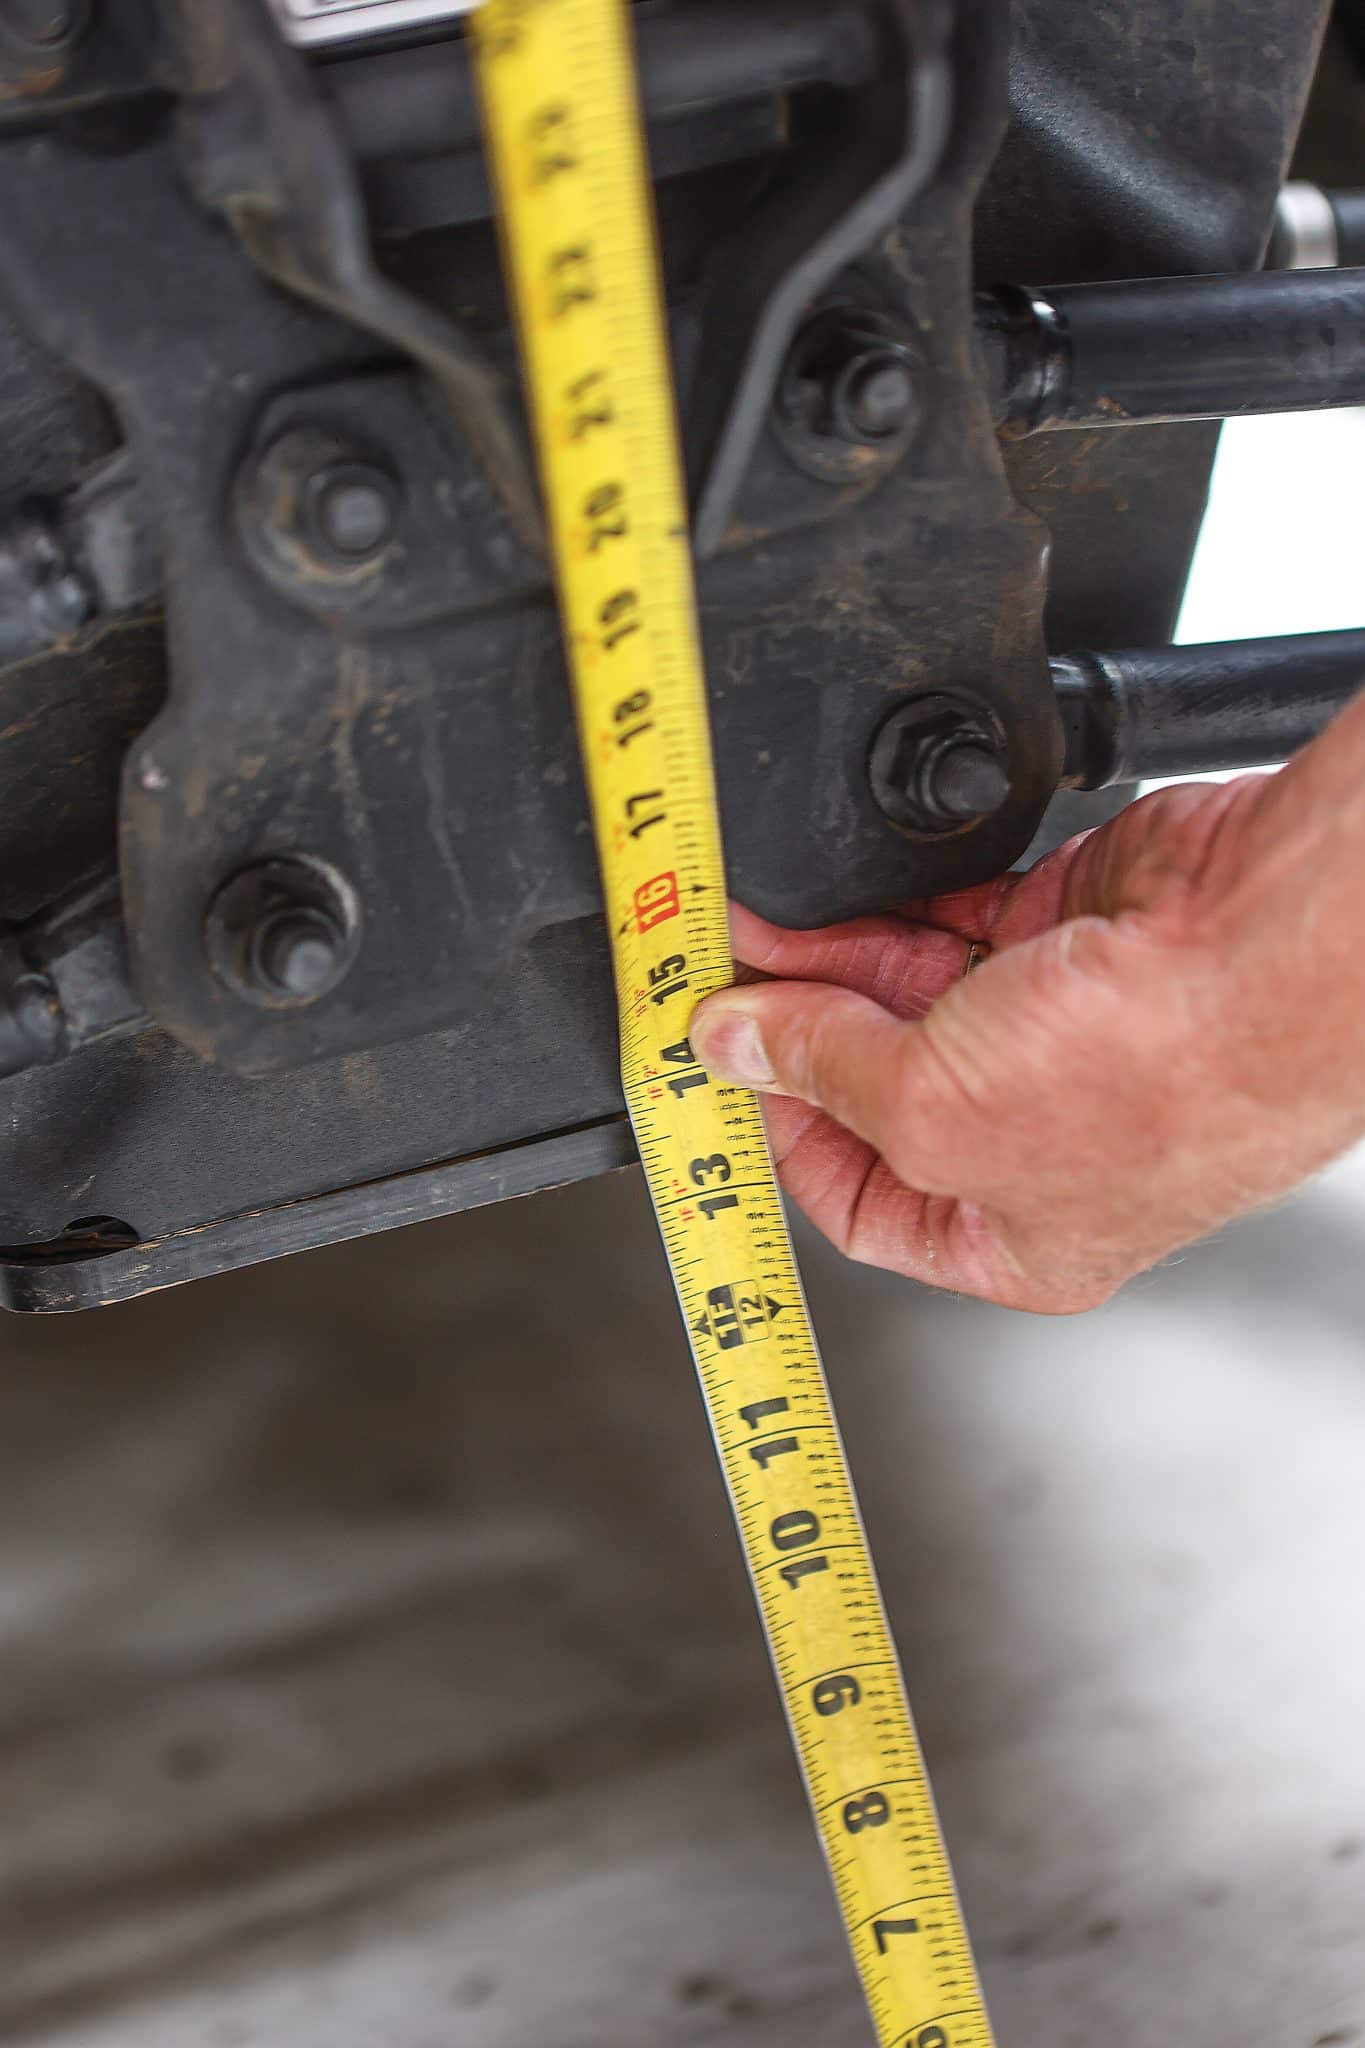
At the rear of the UTV, you’ll want to measure the ground clearance (ride height) below the frame. With the seats empty and the side-by-side in a relaxed parked position, measure at the bottom of the frame rail rather than the skid plate. This X3 measured 16.5 inches at the rear. Now, go to the front and measure the ride height below the frame rails where the A-arms mount to the frame. The X3 measures 15.5 inches up front. This X3 is sitting where we want it, but it’s empty, so if we add the payload to this car, it’s going to sink it down quite a bit more.
Now, you’ll want to measure again with the average number of bodies you normally have in the car. On a sport side-by-side, that could be one to four, which makes a huge difference on suspension. A lone driver versus four big guys could add as much as 750 additional pounds. You’ll also want to measure it with your usual cargo on board, which could include a spare tire, tools, a cooler, etc. Before measuring, fire the car up and roll it back and forth so the ride height drops to where it would be when in motion. Fully loaded with all seats filled, the Can-Am’s ride height dropped 2.5 inches to 14 inches in the rear. Up front, ride height dropped from 15.5 inches to 12 inches. “If you normally ride with four big guys, you need to add a lot of preload to get this vehicle back up where it’s supposed to be.
There are a lot of variables here, like shock angle, differing OEM suspension styles and personal ride preference. You can also go to shocktherapyst.com to get written and video instructions on proper loaded ride height for different side-by-side models. And, they also give you specs on vehicles with different-sized tires. When measuring tire height, use a tape measure. Not all tires are true to the size stamped on the sidewall, so if you have a 22-inch tire but it measures at 21 inches, go with 21 inches. Setting up suspension takes time, so you’ll probably find yourself re-tweaking here and there to get it right.

“We need to add a lot of preload to this vehicle’s ride height to get it back up to where it’s supposed to be, and with a 31-inch tire, that’s somewhere in the neighborhood of 16 inches on an X3 Max,” claims Crowley. The X3 needs to come up 2.5 inches in the rear and 4 inches up front when fully loaded, but don’t confuse ride height numbers with how much preload you’ll be adding to the shocks, as they aren’t the same. You and your buddies will likely be in and out of the seats while you adjust preload.
According to Shock Therapy’s calculations for the X3, we would start by adding 2 inches of preload to the front shocks and 4 inches to the rear shocks. Keep in mind that the rear supports the engine and the cargo area, and has a lot more leverage pushing down on the rear suspension. It could take twice as much preload to raise the rear as it does the front.
At the front shock, we took a measurement from the top of the shock to the top of the preload collar, and then added 2 inches to that to get our new measurement and wrote it down. We did the same for the rear shocks but added 4 inches. Now, we loosen the preload collar, usually done with a spanner wrench, and start cranking the spring down to the new measurement. The preload collar usually consists of a spanner nut and a lock nut to set ride height. (If your stock shock is equipped with a cross-over ring, you’ll likely want to lower it to make room, and we’ll cover adjusting those in the next step).
Adjusting preload is easier to complete with a spring compressor tool. You can also jack the car up to take some pressure off the springs and turn down the collar with your spanner wrench. Clean and lube the shock-body threads to make adjustment easier. Yes, there are other ways to compress the springs using ratchet straps and other home-built contraptions, but keep in mind that there is a lot of force behind shock springs. You could lose a finger or two if you’re not careful. With the spring compressed, you should be able to turn the preload collar down by hand to your new measurement. Do the same for the other front shock and repeat this process for the rear shocks with their new measurement. Now, get everyone back in the car and measure the new ride height and make small adjustments until proper height is achieved. You’ll also want to roll the car back and forth between measurements to relax the suspension.


Some shocks consist of a single spring with a tighter coil at the top; others are known as dual springs, consisting of a tender spring and a main spring separated by a plastic or nylon divider without a cross-over ring. If this is what you have, you can skip this step, tighten up the lock nut on your preload collar and move on to the next step.


A true dual-rate spring system uses a cross-over ring. The cross-over ring sets the point where the spring divider stops and load-transfers from the smaller tender spring (low impacts) to the larger main spring (harder hits). It allows for additional shock tuning and the plushest ride you can get out of a side-by-side shock at varying speeds.
With ride height set, you’re now ready to set your cross-over ring. On the front shocks, the gap between the bottom of the cross-over ring and the top of the spring divider should be 1 to 1.5 inches. The same gap at the rear should be between 2 and 2.5 inches, depending on the side-by-side brand and model. Shock Therapy has the exact number gap measurement for different cars listed on their website.

With ride height and preload locked in, it’s time to turn attention to valving adjustments. Not all side-by-sides have rebound adjustment, most have compression adjustment, and some of those have high- and low-speed compression adjustment. Electronic suspension systems, such as Fox Live Valve, have a computer that adjusts settings automatically in milliseconds. If the latter is you, your side-by-side should be dialed at this point. For the rest, you’re probably going to spend the good part of a day dialing in your valving, but you get to ride while you do it.
Compression is the amount of force it takes to compress your shocks, and you can increase or decrease it depending on how aggressively you drive. If you like high speeds, dunes, whoop-de-doos, jumping and racing, you’ll want more compression to absorb the blows. Rock crawlers and sightseers will prefer less compression for a softer ride at a slower pace.
Rebound refers to how fast your shocks rebound from a hit, and the adjuster is typically at the bottom of the shock. If you’re ripping through a whoop section with short gaps, you’ll want the wheels to rebound faster. If you’re riding trails with occasional cross ruts or jumps, slowing rebound will absorb the blow without bucking. The ultimate goal is to set rebound so that the tire stays in contact with the surface.
Steve Feick is the shock setup specialist at Shock Therapy, and he gave us a crash course on dialing in compression and rebound. “When a customer sends us their shocks, we send them back with the compression and rebound adjusters set in the middle ground,” says Feick. “On this X3, the dual-speed compression adjusters have four full turns of adjustment (soft to hard), which would mean when it leaves Shock Therapy, we’ve set it at two turns. The same goes for rebound adjustment; start with the clickers in the middle. The reason we start in the middle is because you can either go plusher or add more damping to the shock.” Everyone’s riding style is different, so there isn’t a single setting that’s better than others.
Setting high- and low-speed compression can be confusing, but the two actually work together with their individual adjustments. “High-speed compression is going to be your big stuff like G-outs, jumping, bottoming out—anything that’s going to compress the suspension heavily. Slow-speed adjustment is for choppy, washboard, rocky roads—that real chattery stuff. So, depending on the terrain, both can happen at the same time,” says Feick. Shocks that include high- and slow-speed compression allow for the most adjustment for a wider range of plushness at varying speeds over different terrain types. Once compression and rebound are dialed where you want them, your suspension is ready to go.

No matter what you do, upgrading your springs to handle a heavier payload is always the better way to go. In our June 2023 issue, we raved about how well Shock Therapy’s spring kit boosted suspension performance on our Honda Talon 1000-R Live Valve Edition. It’s one of the best performance mods you can make on any side-by-side, turning the machine into a whole new animal.
The X3 we used for this lesson ended up coil-bound on the rear suspension, as we ran out of room to drop the cross-over rings, so upgrading with a heavier dual-rate spring kit was necessary. The additional weight in the cargo area and aftermarket chromoly roll cage added too much sag to the rear springs. So, if your side-by-side has a lot of additional weight due to aftermarket accessories or your stock springs are just worn out from a lot of miles on rugged trails, upgrading your springs is the way to go. Depending on the vehicle brand and model, Shock Therapy’s dual-rate spring kits run for $600–$940 (more if you have them do the installation). Take our word for it, it’s money well spent!
